Friday, 8 February 2013

Beginning blocks 2b

Rail Fence

The strips

Strip squares joined into rows

Completed block

2b , the Rail Fence block, is the easiest of all the blocks we are doing and is very familiar to the group as they did a lot of strip piecing last term. The members were quite pleased to encounter this item though. It's important to use three fabrics and take care with placement else a swastika might materialise.

Tuesday, 5 February 2013

2a and more

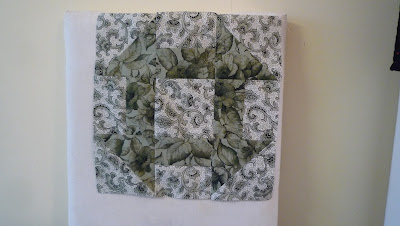
The completed block


I always make two of each block, one completed and one in-construction sample and then complete the second one after the class.

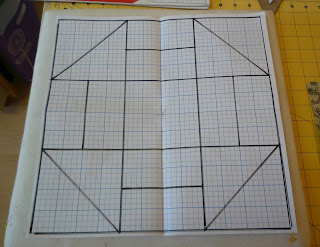
Variable Star diagram


I led a Trip Around the World workshop last term and two more U3A members brought in completed quilts.


I like the Secret Garden block in the centre


Monday, 4 February 2013

Beginning blocks 2a

2a Variable Star with three fabrics

Because of  the snow the U3A class missed a session so we are only up to 2a and 2b this week. 1a and 1b were covered in my posts for 8th and 10th January respectively. This week we drafted quarter square triangles for the first time. Four quarter square triangles form a square and to draft them you draw a diagonal line from corner to corner of the square twice. The straight of grain is on the long side of the triangle and forms the sides of the square. The block is Variable Star and can be made in several fabric combinations. Here I use three.
We drafted the 4" square without and with seams for Block 1a but this time we rotary cut a 4.5" wide strip and subcut the 4 corner squares and rotary cut the centre square individually, gradually adding to the "tool box"; however, the drawing and drafting really helps with understanding block construction and the nature of the shapes which in turn helps us to calculate our rotary cutting strategy.
Templates with and without seams
for the shapes in the block.

Pairs of QST's ready to be joined into the
 star units.
It's important to join the QST's in the
right placement consistently.
These two units will NOT fit together.

Block laid out ready to sew.

QST pairs ready to combine into star units.

Rows sewn and ready to join.
Press towards the squares.

Saturday, 2 February 2013

Bonnie's bags

We have suspended our medallion quilt making for a couple of months as one of our members has gone off in search of winter sunshine. The three remaining members are making a bag from Popular Patch magazine from Moda charm packs or in my case, batik 5" squares. We've made a start on the quilted panels this week.
Mavis laying out her squares


Trish's quilted panels

My fabrics
 

Saturday, 26 January 2013

I finished machine quilting the "Forest Checks" quilt on Friday morning. I might have finished sooner if the thread I was using didn't keep breaking. To be fair it was 12 wt but I managed the centre of the quilt well with a different shade of the same brand. Perhaps the poly cotton border fabric was part of the problem. Now just the binding to do which I shall machine down. The back is all one pleasant blue patterned cotton so if the recipients (eQuilters' 5000 quilts for storm victims) don't care for one side they can turn it over.
Chequered Forest was a possible name but this seemed too poetic for such a practical quilt.

Showing the backing

Thursday, 24 January 2013

The Quilt on My Bed

I have spent the daytime hours machine qulting the monster  quilt or at least that is how it seems to me at the moment. I have more to do tomorrow but will try to get up earlyish and finish.
Meanwhile it's the turn of the the millennium quilt on my bed. Ths appears annually on the blog so  this January I have included snaps of the back.

2000 squares

Corner


Crazy Border, on grain and like the quilt centre hand quilted.

On the back

Part of label

The date!

Wednesday, 23 January 2013

I am continuing stacking and whacking, this time with quarter square triangles though now realise there is only one way to arrange them. I have decided 5 blocks by 7 is the right size for this quilt so spares will go on the back.
The QST's

Cutting out the square

Four squares make four blocks

Tuesday, 22 January 2013

Quilt wrestling

Here are photos of my charity quilt. I've made it as large as possible by the addition of borders and although this looks slighly odd, once on a bed the proportions work much better. Today I set up two tables folded up on top of a third to give a better height and sandwiched the top with pins. Quilting lies in wait on Thursday. . .

Monday, 21 January 2013

Snow Day

View from the sewing room


It should have been the U3A class this morning but we are all snowed in.
I'm finishing up a project which is for practical charitable use. The point is to make it as large as possible with the aid of  a nice probably new duvet cover from a charity shop. I messed up the first cutting up of border pieces so have more or less wasted the back by chopping it up. Anyway I was able to label my last row of pieced blocks by using very handy "labels" from friend Judi  will save lots of rewriting.
My safety pin label "e".
To break up handquilting my heavy sampler quilt I sewed a little sleeve onto the back of this A4 quilt made for the Little Gems tombola at the FOQ a few years ago which I won. It's made by Carol Mowat and I like it very much. I can't find a blog or link in her name. The stand was made by Eric another friend's husband and wonderful woodworker.

Wednesday, 16 January 2013

Spooling

On Saturday I attended an Oast Quilters Spools workshop taught by Carolyn Forster. It's my second class with her and once again it was a lovely day. One of the  best things is seeing  the beautiful quilts she brings along to show us, Spools quilts of course but as we were using jelly rolls to make our spools she later brought out the  quilts from her Jelly Rolls book .
Carolyn and quilt

It was fun seeing all the different "looks" according to fabric choices. My humble aim was to make a cushion cover and I finished my quota of blocks on the day, having learned minutely how to tackle inset seams, a transferable skill.
My cushion cover made from Cherrywoods

Another participant's blocks

Tracy's, using 1930's reproductions.

Tuesday, 15 January 2013

Quay Quilters

Ruby's Cut and sew inspired by Marla Alexander
There were quite a lot of  Show & Tell items at Quay Quilters when we met on the 9th for the first meeting of the New Year.

Gillian has made a replacement for her son's quilt which is now getting worn.

Jane's work in progress

I think this may be Jane's too but not sure.

Vanessa used a gift of vintage blocks to make this.

Pippa's wallhanging, with binding still to finish.

Thursday, 10 January 2013

Beginning Blocks 1b


The units and sewing order
Next block up, this time a 4-patch, is "Magic Box variation", the variation being the square in a square in the middle. This is not a block name I am familiar with. This time the grid is 4 by 4 squares although not all the lines are drawn in so the oblong unit is 3" x 6" finished and you need to cut two 2" by 6.5" strips to make it. This we chose to strip piece with long strips and sub-cut. To complete the block we made templates for the 3" HST's and the square in a square. Although technically the square in a square has bias edges we chose to cut it on the straight.

The first completed block using four fabrics.


The second version using only three fabrics.

Tuesday, 8 January 2013

Beginning blocks 1a

Drafted block

Churn Dash or Double Monkey Wrench

At the U3A the newish quilters are having a back to the beginning term, six sessions and two blocks a session. We are looking at the common shapes in block patchwork, the square, half square triangle, quarter square triangle, oblong and combinations such as the square in a square and flying geese. We are starting with templates but moving on to other techniques involving rotary cutting and also foundation piecing. However I think learning to draft and template making helps one to analyse patterns and become more independent as a quiltmaker. Also once having grasped the concept of templates and pattern making one can go on to use these techniques in very creative ways - many art quilters begin with a "cartoon" that is cut up into the individual shapes.


Anyway we begin by testing the accuracy of our 1/4" by sewing two 2" squares together (2x3.5'') and adding a 2x3.5'' strip to result in a 3.5" square.


We then went on to draft the block on 12'' graph paper dividing it into 4'' squares as Churn Dash is a 9-Patch block. There are three different shapes - square, half square triangle and oblong - and on a second piece of graph paper students drew each one using the original diagram as a guide. Each piece was cut round roughly and glued to card; we used cereal boxes. It's best to glue the paper shape onto the printed shiny side of the box so the rougher matte surface will cling to the fabric at the final stage. Each template was labelled with its shape, finished size and a minus sign to show the seam allowance hadn't been added. The little brass wheel is a wonderful gadget known as a Wonder Wheel or Quilters' Quarter wheel.
We used it to add seam allowances by sticking a pencil in the central hole and then moving it round the card to make unfinished size templates. In the picture the left hand which would normally be on the template to hold it steady is missing because it was holding the camera.
 
You can use either template to draw the shape onto the reverse side of the fabric. Here I've used the finished size template to draw the sewing line, useful if hand piecing.
When we drafted the block we started with the major lines and filled them in; when sewing it's the opposite - we sew the square units then join them first into rows then the block.
STAGE ONE - set out shapes and sew units
Stage TWO - sew rows
Stage THREE - sew block
Here I've used three fabrics but in the first version I used two.